Powered by Blogger.
Odoo ERP System | Odoo Blog

 Odoo Human Resource Management module deals with the management of employees and their related strategies. Here Odoo provides the features like contract management, leaves, Attendances, timesheets, related to the payroll. To generate the payslip for each employee we have to configure their contracts first. If an employee has an active contract, payslips can be generated. This contract specifies the basic pay, working schedules, duration, and other related details. Employees can have one or more contracts, but while generating the payslips, an active one or the latest one will be taken.

The Odoo Payroll system is integrated with the Accounting module, where after generating and confirming payslip will create a journal entry on Accounts. This can be further processed by an account adviser or manager. To enable integration with the Account we have to install the plugin Payroll Accounts from the Odoo apps menu. These generated payslips can be exported as pdf and officers or managers can analyze the reports that are provided by Odoo.

To generate a payslip for the employee, first, we have to set up the contract with a salary structure. The salary structure is the record of the set of rules and these structures can be inheritor utilize for other contracts. The salary structure can be included with one or more salary rules, which rules specify the actual computation that needs to be done while generating payslip. These configurations can be done under the payroll settings. Using the salary structure, salary rules menu, you can create structures and rules.

Odoo HR Payroll Management also supports the generation of payslips as batches. So we can include one or more employees or category wise batches. The mass creation of payslip for a group of employees can be achieved through this scenario.

To know more about Odoo Software and the Implementation process refer to the link

Share
Tweet
Pin
Share
No comments

 If you are not an IT-related person, you might be amazing what ODOO is?


Odoo is nothing but a suite of open-source business apps written in Python programming language and was released under the AGPL license. Odoo is the leading open-source solution. The previous name of Odoo is Open ERP ( until May 2014 ). The main Odoo components are the server, 260 core modules, and around 4000 + community modules it does possess. Odoo has no licensing cost.


Odoo is a popular business suite for any business in the market. Sometimes, basic Odoo modules are capable of fulfilling the requirements hence there is no need for any customization and customization charge.

This is just an introduction we will check out all the details one by one.


MODULES AND FEATURES 


1. FINANCE AND ACCOUNTING MODULE

1. Basic Accounting

2. Accounting Dashboard  

3. Dynamic Accounting

4. Bank Interface

5. Statement Import: Coda, OFX, QIF

6. Check Printing & Deposit

7. Customer Follow-ups

8. Plaid Connector

9. SEPA payments

10. Payment Management

11. Batch deposit 


2. CUSTOMER RELATION MANAGEMENT MODULE - CRM

1. Customer Relationship Management

2. Lead Management / Opportunity Tracking

3. Mail Gateways

4. Direct Marketing

5. Address Book

6. Phone Calls

7. Calendars

8. Customer portal 


3. HUMAN RESOURCE MANAGEMENT MODULE -  HRM

1. Employee Directory

2. Expenses

3. Vacations

4. Recruitment

5. Appraisals

6. Departments Dashboard

7. Skills Management

8. Holidays

9. Attendances 


4. PROJECT MANAGEMENT MODULE

1. Tasks

2. Issues

3. Timesheets

4. Timesheets Chrome & Mobile App

5. Forecasts

6. Gantt Charts

7. Operational Management

8. Financial Management


 5. SALES MANAGEMENT

1. CRM

2. Sales

3. VoIP Integration

4. e Signature

5. Subscriptions

6. Digital products


 6. INVENTORY AND SUPPLY CHAIN MANAGEMENT MODULE 

1. Inventory Management

2. MRP

3. Purchase Management

4. Bar code support

5. Shipping: UPS, FedEx, DHL, USPS, Temando

6. Multi-company flows


 7. MARKETING  MODULE 

1. Events

2. Expenses

3. Email Marketing

4. Live Chat

5. Lead Scoring

6. Email Marketing Templates


 8 . E-COMMERCE MANAGEMENT MODULES 

1. Magento Integration

2. e Bay Integration

3. Amazon.com Integration

4. Channel Advisor Integration

5. Shipping & Payments integration


 9. LOGISTICS MANAGEMENT MODULE  

1. Ware house Management

2. Shipping Management

3. Manufacturing

4. Quality & Repairs

5. Products and price lists


ADVANTAGES OF ODOO 

1. LOW COST:

You can easily download the software is free of cost ( community version ). And you can experience its amazing capabilities. Your cost of investment is low due to the lack of licensing fees.  Hence, you can allocate the major portion of the budget for implementation or customization according to your needs.  


2. MODULAR NATURE: 

Odoo is simply modular in nature. You can begin with simple basic modules and you can implement all other modules according to your future requirement. You can use each module separately or integrate with any other module as per your need.


3. COMPREHENSIVE NATURE:

Odoo offers a wide variety of functionalities. With the help of 260 core modules and 4000+ community modules, Odoo helps us to meet all our requirements beyond our expectations.  Odoo is a single platform to meet all our requirements.


4. THE MOST ADVANCED TECHNOLOGY:

Odoo is used modern and updated technology. And it always modifying or developing along with the new technology.


5. CUSTOMIZATION IS EASY:

In this competitive world, each organization needs continuous innovation for the growth of the organization. Hence to attain growth and efficiency each organization needs some particular level of customization which is easily possible in Odoo. 

You can check the infographics comparison of Odoo Vs SAP here. 

Share
Tweet
Pin
Share
No comments

 Portal users are created by the company to grant access to the company's website upon gaining trust or subscribing to certain services. In an institution where a customer is in need of certain course materials and or to orders, they are given portal access to the website. These can only be provided by the user to whom is in need of access and are provided on the terms and conditions set by the company. The main advantage is that the customer is only provided with the option to view, read and order; he/she cannot edit them or remove them, thus restricting them from removing valuable documents of your website.


The Odoo platform allows the user to create unlimited portal access to clients based on business needs. This option to allow Odoo portal users helps the company to gain clients and flourish their business. In certain instances, only privileged clients are provided with access to the website. In all instances the Odoo platform allows the user to verify and store the credentials of the user in the database. Which allows in restricting non-potential clients or frauds into the platform. 


This blog will describe,

How To Grant Portal Access To A Customer

What Are The Options Available For Portal Users In The Website Menu?


Grant Portal Access To A Customer/ Client.

The portal access to a customer or a client can be created while setting up the contacts in the Odoo platform

To enable the Odoo portal access to a customer go to the Customer menu > Create a customer


The name and address description along with the contact details should be also provided. Accounting menu and the journal entries can be assigned along with the sales and purchase terminologies. After the descriptions are being filled the user can save the details.

Reference: Portal User Options for Website Menu in Odoo 13


Share
Tweet
Pin
Share
No comments

 Product management is a tedious task for any business organization and could take a heavy toll on the working hours. Managing the product stock, purchasing, and maintaining stock can be a hectic task for a large organization. The Odoo software has a good product management module and also provides the user with various customizable settings in the inventory section of the platform. 


The product stock should be ordered and some may be removed from the inventory, this is where the application settings of the inventory module come in handy to the user. The replenish product option available in the Odoo inventory module helps the user to assign a specific root to the product depending on the configuration of the product. 


This option helps the user to move the product from one location to another as well as create a manufacturing order based on the stock of availability. While replenishing a product a specific vendor should be assigned since the product can only be moved to via a vendor.


This blog will describe replenishing options for products in Odoo works, by describing an example of how to use the option in Odoo.


How the replenishment option works in Odoo 13.


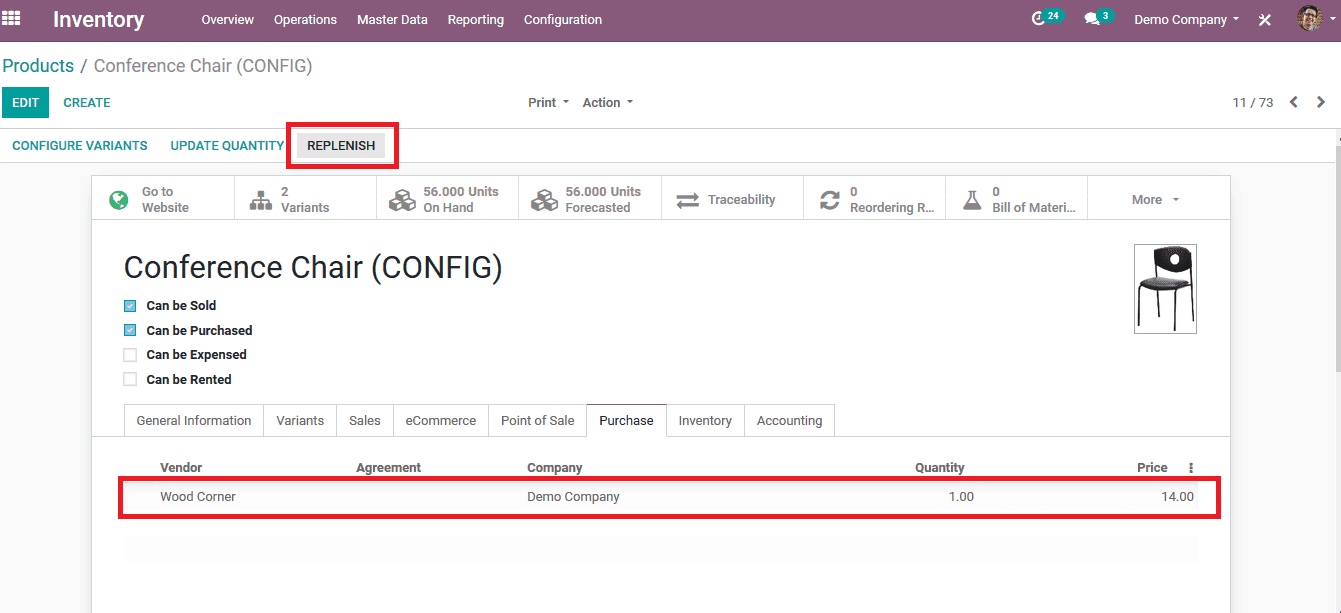
Step 1: The user should have a product in the stock to be replenished or create a new product that should be replenished. In order to create a product while in the inventory module the user should navigate to the product menu from the dashboard. Upon creating a product the user should assign a vendor. 


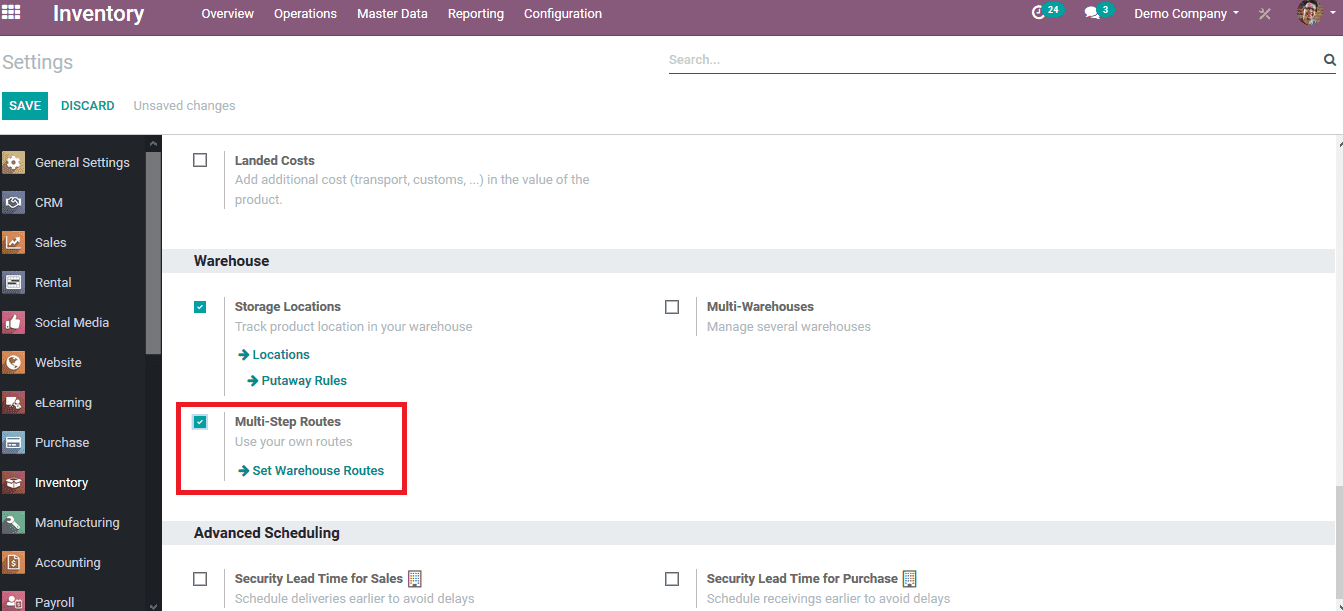
Step 2: After creating the product in the settings menu of the inventory module the user should enable the multi-step routes option in the warehouse menu. Upon enabling this option the user can use his own routes of transfer within the warehouse.


replenish-product-in-odoo-13-cybrosys


Step 3: Choose the replenish option available in the products menu. As you can see in the below image a vendor has been assigned to the product if not assigned do so by editing the product. Upon selecting the replenish option a new window pops up.


replenish-product-in-odoo-13-cybrosys


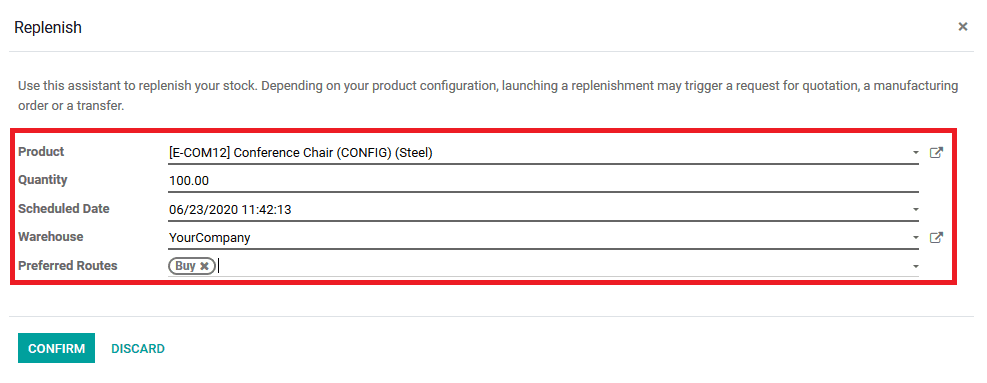
Step 4: Fill in the details required. The product can be selected if there are different variants available. The required quantity can be entered there and the scheduled date can be chosen. In the case of multiple warehouses available to the user select one. The preferred routes can be selected from buy, manufacture, or create a new one. Confirm the entries at the end.


replenish-product-in-odoo-13-cybrosys


Now the user has created a replenishment order to buy from the vendor for hundred conference chairs in the above example. The order can be seen in the quotations menu of the purchase module.


Reference and originally published at : How to Replenish a product in Odoo 13

Share
Tweet
Pin
Share
No comments

 A down payment is a common factor used in various business organizations allowing the customers to pay a percentage of amount while ordering and paying the balance at the time of delivery. The down payment functionality comes as an add-on feature in every business organization allowing them to attract customers and business opportunities. The down payment facility can be seen in all modern applications of business from the online business platforms to regular shops. The down payments can be done for a fixed amount or a fixed percentage as per the choice of the company. The Odoo 13 platform has the feature to establish down payment in both ways of a fixed amount and fixed percentage as it varies across business organizations.


Down Payments In Odoo 13


In the Odoo platform down payment is created as a separate product and is activated upon the request of the user. The down payment option for a sale can be enabled while invoking the check out an order which is available in the invoicing menu of the sales. The down payments in Odoo can be clearly explained with the help of an example of a sale.


How To Setup Down Payments In Odoo 13


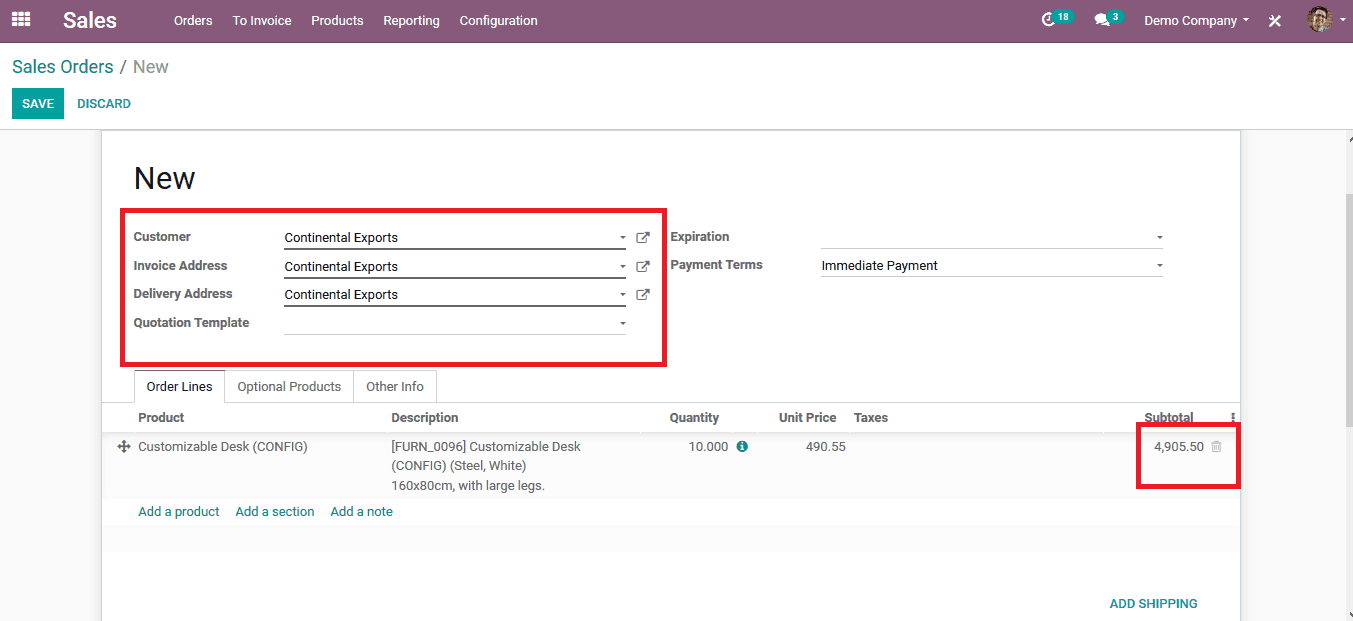
Step 1: Initially to enable down payment create a sales order from the sales module and fill in all the details. Choose the available products and avail the number of units needed. Check for the total amount down below the products.


down-payments-in-odoo-13-cybrosys


Step 2: save the sales order after filling in all the details and opt for the option to create an invoice. Upon choosing to create the invoice a pop-up window opens up as shown below in the image.


Step 3: Choose the option for invoicing as per the user needs.

Regular invoicing generates a normal invoice as of the general operation. In case of down payments, the user can avail two options. One with a fixed amount and another with a fixed percentage. Both are used in various business organizations as per their terms and conditions.

Upon selecting the required option click on create and save the invoice.

Read more: Down Payments in Odoo 13 

Share
Tweet
Pin
Share
No comments
Older Posts

recent posts

Copyright © 2020 Cybrosys